This was pretty easy but for some reason it took me a while to get all the information together. This tutorial is for Proxmox VE OS ZFS boot disk replacement. Some of these steps are part of just replacing a ZFS drive on disks just used for storage, but its not the same. This is a tutorial specifically for replacing a failing or failed disk from the ZFS storage that the Proxmox OS resides on. Information can be found directly from Proxmox website. This video also very helpful.
Before You Start The Proxmox VE OS ZFS Boot Disk Replacement
If you’re replacing a failing drive chances are you have a new drive ready. If the new drive you will be using as the replacement has been used before, you will want to wipe it first. I used clean in diskpart on a Windows computer. To avoid potential problems wipe the disk before using it.
If you have a brand new disk you should be fine and you can skip this step. If you’re like me and want to make sure – pop it in somewhere to make sure its blank and is not formatted or partitioned.
Before continuing take not of the serial number of the drive. I take a picture of all labels on the new drive as it will help identify it later. You will need it for later to identify it during the process.
After prepping the new drive / replacement drive, we can start replacing the faulty drive.
If you already inserted the new drive before taking down the serial or if you already swapped the bad drive for the new one, you can use the following command to help you identify the drives.
ls -althr /dev/disk/by-id/Replacing The Faulty Drive
Proxmox VE OS ZFS boot disk replacement – Lets start by identifying the drives currently in the ZFS storage (including the drive to be replaced).
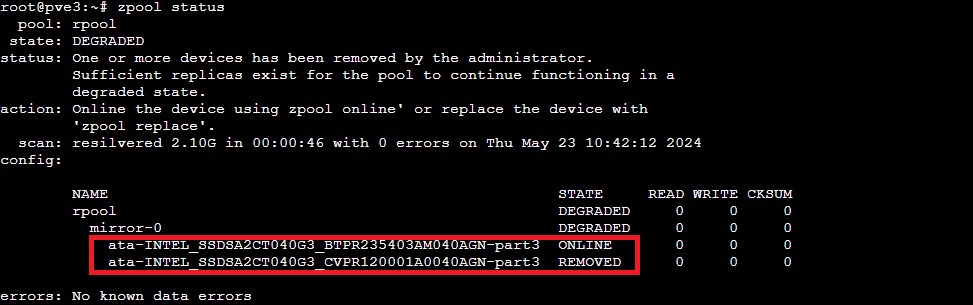
zpool statusThis will show you the status of the ZFS pool and the drive that’s failing. Take note of both drive, especially the one that’s failing. The drive serial number should be part of the ID. In some cases you may not see the drive that’s failing. You may see a long set of numbers instead. In my case the damaged drive appeared as removed. See examples below.

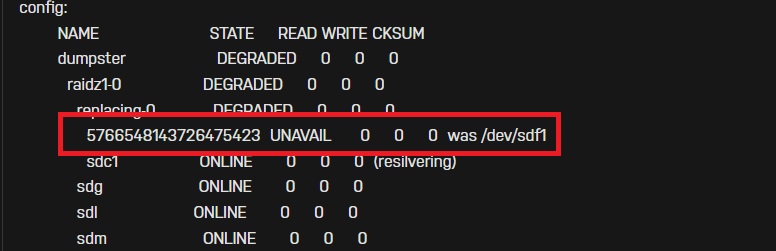
No problem – take note of the long string of numbers. We can use them instead.
Next thing you want to do is insert the new drive if hot swap is an option. If not power off the computer / sever and plug in the new drive or replace the damaged drive with the new one. Use the ID you noted from the zpool status command.
Copying The Partition Table
Next we want to copy the partition tables to the new drive. We want to use the drive that is still in good working order (healthy). DO NOT use the drive that is failing if its still plugged in to make copies. The data may be corrupt. Use as healthy drive.
Use lsblk to list the drive directories.

As you can see my old healthy drive is sda and my new drive is sdb. I will copy from sda.
sgdisk <healthy bootable device> -R <new device>In my case it will be sgdisk /dev/sda -R /dev/sdb

Now we want to give the new device a unique id
sgdisk -G <new device>In my case it will be sgdisk -G /dev/sdb
Before continuing lets enable auto expand if not enabled already. Not necessary, so you can skip.
zpool set autoexpand=on rpoolBefore we continue we need the ID of the new drive. Use the following command to get the ID
ls -l /dev/disk/by-id/Heres where you need those IDs collected in the beginning. For me the IDs will be “ata-INTEL_SSDSA2CT040G3_CVPR1085016C040AGN-part3”
zpool replace -f <pool> <old zfs partition> <new zfs partition>In my case it will be zpool replace -f rpool /dev/disk/by-id/ata-INTEL_SSDSA2CT040G3_CVPR120001A0040AGN-part3 /dev/disk/by-id/ata-INTEL_SSDSA2CT040G3_CVPR1086016C040AGN-part3
You can type zpool status to see if the drive is being replaced and resilvering.

To make the new drive bootable we need to copy the ESP from the old healthy drive which should reside in the #2 partition.
proxmox-boot-tool format <new disk's ESP>In my case it will be proxmox-boot-tool format /dev/sdb2 --force
proxmox-boot-tool init <new disk's ESP> [grub]In my case it will be proxmox-boot-tool init /dev/sdb2
Lets check the zpool status again. Everything should look okay now.
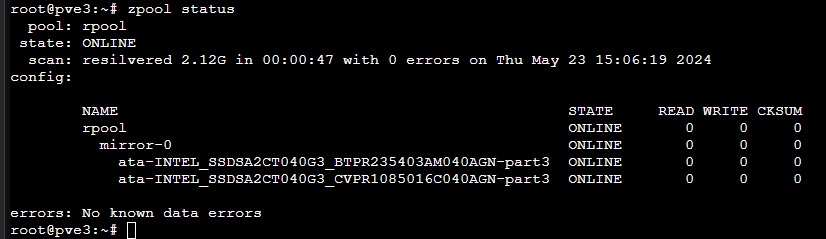
Pool looks good. now lets check the Proxmox boot tool.
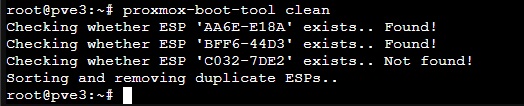
proxmox-boot-tool statusAs you can see there’s a warning. Most likely you’ll have the same warning.

proxmox-boot-tool clean will remove the warning
Remove the old damaged drive.
Done!
If you feel adventurous and want to test just remove the old healthy and try to boot. If everything looks okay, put the old drive back in and you’re done.